Spring - MVC Framework Tutorial
The Model encapsulates the application data and in general they will consist of POJO. (Model은 프로그램 데이터를 캡슐화하고 일반적으로 POJO로 구성될 것이다.)
The View is responsible for rendering the model data and in general it generates HTML output that the client's browser can interpret. (View는 model data를 랜더링하는 책임이 있으며 일반적으로 client의 브라우저가 해석(inerpret)할 수 있는 HTML 출력을 생성한다.)
The Controller is responsible for processing user requests and building appropriate model and passes it to the view for rendering. (Controller는 사용자의 요청처리, 적절한 모델 사용(building) 그리고 랜더링을 위한 view에 이것을 전달하는 책임이 있다.)
The DispatcherServlet
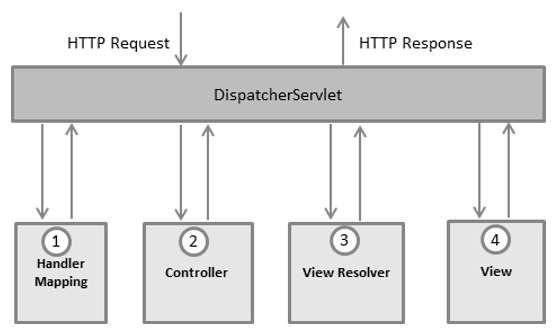
아래는 DispatcherServlet으로 들어오는 HTTP 요청에 일치하는 이벤트의 순서이다.
After receiving an HTTP request, DispatcherServlet consults the HandlerMapping to call the appropriate Controller. (HTTP 요청을 수신한 후 DispatcherServlet은 적절한 Controller를 호출하기 이해 HandlerMapping의 조언을 구한다.)
The Controller takes the request and calls the appropriate service methods based on used GET or POST method. The service method will set model data based on defined business logic and returns view name to the DispatcherServlet. (Controller는 요청을 갖고 GET 또는 POST method를 사용하는 것을 바탕으로 적절한 서비스 method를 호출한다. 서비스 method는 정의되어있는 비즈니스 로직을 바탕으로 모델 data를 설정하고 DispatcherServlet에 view의 이름을 반환할 것이다.)
The DispatcherServlet will take help from ViewResolver to pickup the defined view for the request. (DispatcherServlet은 요청을 위해 정의된 view를 가져오기 위해 ViewResolver의 도움을 받을 것이다.)
Once view is finalized, The DispatcherServlet passes the model data to the view which is finally rendered on the browser. (View가 종료되어지면 DispatcherServlet은 model data를 최종적으로 브라우저에서 랜더링되는 View로 전달한다.)
위에 언급된 모든 컴포넌트 즉 HandlerMapping, Controller, ViewResolver는 web 프로그램을 위해 어떤 추가적 필수요소를 갖는 순수(plain) ApplicationContext의 확장인 WebApplicationContext의 일부이다.
Required Configuration
web.xml파일에 URL mapping을 사용하는 것을 이용하여 DispatcherServlet이 다루기를(Handle) 원하는 map 요청이 필요하다. 아래는 HelloWeb DispatcherServlet 예제를 위한 선언과 매핑을 보여주기 위한 예이다.
<web-app id="WebApp_ID" version="2.4"
    xmlns="http://java.sun.com/xml/ns/j2ee"
    xmlns:xsi="http://www.w3.org/2001/XMLSchema-instance"
    xsi:schemaLocation="http://java.sun.com/xml/ns/j2ee
    http://java.sun.com/xml/ns/j2ee/web-app_2_4.xsd">

    <display-name>Spring MVC Application</display-name>

   <servlet>
      <servlet-name>HelloWeb</servlet-name>
      <servlet-class>
         org.springframework.web.servlet.DispatcherServlet
      </servlet-class>
      <load-on-startup>1</load-on-startup>
   </servlet>

   <servlet-mapping>
      <servlet-name>HelloWeb</servlet-name>
      <url-pattern>*.jsp</url-pattern>
   </servlet-mapping>

</web-app>
web.xml 파일은 web 프로그램의 WebContent/WEB-INF 디렉토리에 있을 것이다. HelloWeb DispatcherServlet의 초기화에서 framework는 프로그램의 WebContent/WEB-INF 디렉토리에 위치한 [servlet-name]-servlet.xml의 이름을 가진 파일에서 application context를 로드하려고 시도할 것이다. 이경우 이 강좌에서는 HelloWeb-servlet.xml이 될 것이다.
다음으로 <servlet-mapping> 태그는 URL이 DispatcherServlet에 의해 다루어(handle)질 것임을 나타낸다. 여기서 .jsp인 모든 HTTP요청은 HelloWeb DispatcherServlet에 의해 다루어질 것이다.
만약 [servlet-name]-servlet.xml같은 기본설정 파일이름과 WebContent/WEB-INF같은 기본 위치를 사용하지 않고 싶다면, 아래와 같이 web.xml에 ContextLoaderListener servlet listener를 추가하는 것으로 파일이름과 위치를 설정할 수 있다.
<web-app...>

<!-------- DispatcherServlet definition goes here----->
....
<context-param>
   <param-name>contextConfigLocation</param-name>
   <param-value>/WEB-INF/HelloWeb-servlet.xml</param-value>
</context-param>

<listener>
   <listener-class>
      org.springframework.web.context.ContextLoaderListener
   </listener-class>
</listener>
</web-app>
이제 web프로그램의 WebContent/WEB-INF 디렉토리에 위치한 HelloWeb-servlet.xml파일을 위해 요구되어지는 설정을 점검해 보자.
<beans xmlns="http://www.springframework.org/schema/beans"
   xmlns:context="http://www.springframework.org/schema/context"
   xmlns:xsi="http://www.w3.org/2001/XMLSchema-instance"
   xsi:schemaLocation="
   http://www.springframework.org/schema/beans
   http://www.springframework.org/schema/beans/spring-beans-3.0.xsd
   http://www.springframework.org/schema/context
   http://www.springframework.org/schema/context/spring-context-3.0.xsd">

   <context:component-scan base-package="com.tutorialspoint" />

   <bean class="org.springframework.web.servlet.view.InternalResourceViewResolver">
      <property name="prefix" value="/WEB-INF/jsp/" />
      <property name="suffix" value=".jsp" />
   </bean>

</beans>
아래는 HelloWeb-servlet.xml파일에 대해 중요한 요점들이다.
The [servlet-name]-servlet.xml file will be used to create the beans defined, overriding the definitions of any beans defined with the same name in the global scope. ([servlet-name]-servlet.xml 파일은 bean 정의, global scope에서 동일 이름을 가지고 정의된 bean의 정의를 overriding하기 위해 사용될 것이다.)
The <context:component-scan...> tag will be use to activate Spring MVC annotation scanning capability which allows to make use of annotations like @Controller and @RequestMapping etc. (<context:component-scan...> 태그는 @Controller와 @RequestMapping 등과 같이 annotation의 사용을 허락하는 Spring MVC annotation scanning 능력(capability)을 활성화(activate)하는데 유용할 것이다.)
The InternalResourceViewResolver will have rules defined to resolve the view names. As per the above defined rule, a logical view named hello is delegated to a view implementation located at /WEB-INF/jsp/hello.jsp . (InteralReourceViewResolver는 view 이름을 결정(resolve)하기 위해 정의되어진 규칙을 갖는다. 위에 결정된 규칙에 따라 hello로 이름지어진 local view는 /WEB-INF/jsp/hello.jap에 위치한 view 구현(implementation)에 위임되어 진다.)
다음은 어떻게 실제 컴포넌트 즉, Controller, Model, View를 생성하는지를 볼 것이다.
Defining a Controller
DispatcherServlet은 구체적인 기능을 수행하기 위해 controller에 요청을 취임한다. @Controller annotation은 특정 class가 controller의 역할을 제공하는 것을 나타낸다. @RequestMapping annotation은 전체 class또는 특정 handler method에 URL을 map하기 위해 사용되어 진다.
@Controller
@RequestMapping("/hello")
public class HelloController{

   @RequestMapping(method = RequestMethod.GET)
   public String printHello(ModelMap model) {
      model.addAttribute("message", "Hello Spring MVC Framework!");
      return "hello";
   }

}
@Controller annotation은 Spring MVC controller로써 class를 정의한다. 여기 @RequestMapping의 첫 사용은 이 controller의 모든 handling method가 /hello 경로(path)에 관련있음을 나타낸다. 다음 @RequestMapping(method = RequestMethod.GET) annotation은 HTTP GET요청을 다루기(handle) 위한 controller의 기본 service method로써 printHello() 함수를 선언하기 위해 사용되어 졌다. 동일 URL에 POST 요청을 다루기 위한 다른 method를 정의하는 것도 가능하다.
아래와 같이 @RequestMapping의 부가적인 속성(attribute)를 추가할 수 있는 다른 형식으로 위의 controller를 작성할 수 있다.
@Controller
public class HelloController{

   @RequestMapping(value = "/hello", method = RequestMethod.GET)
   public String printHello(ModelMap model) {
      model.addAttribute("message", "Hello Spring MVC Framework!");
      return "hello";
   }

}
value 속성은 handler method가 mapping되어질 URL을 나타내고 method 속성은 HTTP GET요청을 다루기 위한 service method를 정의한다. 위에 정의된 controller에 대해 주의할 중요한 점이 있다.
You will defined required business logic inside a service method. You can call another methods inside this method as per requirement. (service method내 요구된 비즈니스 로직이 정의되어질 것이다. 요구(requirement)에 따라 이 method내에서 다른 method를 호출할 수 있다.)
Based on the business logic defined, you will create a model within this method. You can setter different model attributes and these attributes will be accessed by the view to present the final result. This example creates a model with its attribute "message". (정의된 비즈니스 로직을 기반으로 method내에 model을 생성할 것이다. 다른 model 속성을 설정할 수 있고(?? 왜 setter지???) 이 속성은 최종 결과를 표현하기 위해 view에 의해 접근될 것이다. 이 에제는 이것의 message속성을 사용하여 model을 생성한다.)
A defined service method can return a String which contains the name of the view to be used to render the model. This example returns "hello" as logical view name. (정의된 service method는 model을 랜더링하기 위해 사용되어지는 view의 이름을 포함하는 String을 반환할 수 있다.)
Creating JSP Views
Spring MVC는 다른 표현 기술(different presentation techologies)을 위해 많은 형태의 view를 지원한다. 이는 JSP, HTML, PDF, Excel worksheet, XML, Velocity template, XSLT, JSON, Atom, RSS feed, JasperReports 등을 포함한다. 하지만, 일반적으로 JSTL로 작성된 JSP template을 가장 많이 사용한다. 그럼 /WEB-INF/hello/hello.jsp의 hello view를 작성해 보자.
<html>
   <head>
   <title>Hello Spring MVC</title>
   </head>
   <body>
   <h2>${message}</h2>
   </body>
</html>
여기 ${message}는 Controller내부에 설정(setup)한 속성이다. view내부에서 보여지는 다수의 속성을 가질 수 있다.
Spring Web MVC Framework Examples:
위의 개념을 기반으로 Spring Web Application을 만드는 것에 도움이 될 몇몇 중요한 예제를 보자.
| S.N. | Example & Description |
|---|---|
| 1 | Spring MVC Hello World Example This example will explain how to write a simple Spring Web Hello World application. (이 예제는 어떻게 간단한 Spring Web Hello World 프로그램을 작성하는지를 설명할 것이다.) |
| 2 | Spring MVC Form Handling Example This example will explain how to write a Spring Web application using HTML forms to submit the data to the controller and display back a processed result. (이 예제는 controller에 data를 전송(submit)하고 처리된 결과를 표시하기 위해 HTML form을 사용하는 Spring Web Application을 작성하는 법을 설명할 것이다.) |
| 3 | Spring Page Redirection Example Learn how to use page redirection functionality in Spring MVC Framework. (Spring MVC framework에서 page redirection 기능을 사용하는 법을 배운다.) |
| 4 | Spring Static Pages Example Learn how to access static pages along with dynamic pages in Spring MVC Framework. (Spring MVC framework에서 동적 page와 마찬가지로 정적 페이지에 접근하는 법을 배운다.) |
| 5 | Spring Exception Handling Example Learn how to handle exceptions in Spring MVC Framework. (Spring MVC framework에서 예외(exception)을 다루는 법을 배운다.) |
--> 먹구 살려는 일이 우선이다보니 요 근래는 진도가 더디게 나가고 있다.
각각의 예제는 별도의 강좌를 통해 올릴예정이다.
Spring에 관련된 내용도 거의 끝나가고 해서 다음에는 무엇을 할까 보니 아무래도 Spring을 통해 database에 접근하는 방법이 현장에서 쓰는 방법과 좀 다르게 보일 수 있을 것 같다는 느낌이 들었다. 그래서 현장에서 많이 쓰고 있는 iBatis를 하려고 한다. (위 예제 5개와 log4j에 관한 강좌만 남았다..)