Maven - Build Profiles
What is Build Profile?
Types of Build Profile
| Type | Where it is defined |
|---|---|
| Per Project | Defined in the project POM file, pom.xml (프로젝트 POM 파일 - pom.xml에 정의된다.) |
| Per User | Defined in Maven settings xml file (%USER_HOME%/.m2/settings.xml) (Maven 설정 xml파일에 정의된다.) |
| Global | Defined in Maven global settings xml file (%M2_HOME%/conf/settings.xml) (Maven grobal 설정 xml파일에 정의된다.) |
Profile Activation
Maven build porfile은 다양한 방법으로 활성화 될 수 있다.
Explicitly using command console input. (명시적으로 콘솔 입력을 사용하여)
Through maven settings. (Maven 설정을 통하여)
Based on environment variables (User/System variables). ( 환경변수에 기초하여 - 사용자/시스템 변수)
OS Settings (for example, Windows family). (OS 설정 - 예를 들면 Windows family)
Present/missing files. (파일 존재/부재)
Profile Activation Examples
프로젝트에 아래와같은 디렉토리 구조를 갖는다고 가정해보자.
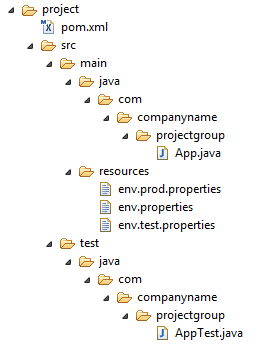
이제 'src/main/resources'아래 세가지 환경 표시 파일이 있다.
| File Name | Description |
|---|---|
| env.properties | default configuration used if no profile is mentioned. (언급된 profile이 없다면 기본적으로 사용되어지는 설정) |
| env.test.properties | test configuration when test profile is used. (테스트 profile이 사용되될 때 test 설정) |
| env.prod.properties | production configuration when prod profile is used. (prod profile이 사용될 때 production 설정) |
Explicit Profile Activation
아래 예제에서 테스트 단계에서 maven-antrun-plugin:run goal을 추가할 것이다. 이는 다른 profile에 대해 text message를 출혁하게 할 것이다. 다른 profile을 정의하기 위해 pom.xml을 사용하고 maven command를 사용하여 콘솔에서 profile을 활성화할 것이다.
C"\MVN\project폴더에 아래 pom.xml을 생성하였다고 가정하자.
<project xmlns="http://maven.apache.org/POM/4.0.0"
   xmlns:xsi="http://www.w3.org/2001/XMLSchema-instance"
   xsi:schemaLocation="http://maven.apache.org/POM/4.0.0
   http://maven.apache.org/xsd/maven-4.0.0.xsd">
   <modelVersion>4.0.0</modelVersion>
   <groupId>com.companyname.projectgroup</groupId>
   <artifactId>project</artifactId>
   <version>1.0</version>
   <profiles>
      <profile>
      <id>test</id>
      <build>
      <plugins>
         <plugin>
            <groupId>org.apache.maven.plugins</groupId>
            <artifactId>maven-antrun-plugin</artifactId>
            <version>1.1</version>
            <executions>
               <execution>
                  <phase>test</phase>
                  <goals>
                     <goal>run</goal>
                  </goals>
                  <configuration>
                  <tasks>
                     <echo>Using env.test.properties</echo>
            <copy file="src/main/resources/env.test.properties" tofile
		    ="${project.build.outputDirectory}/env.properties"/>
                  </tasks>
                  </configuration>
               </execution>
            </executions>
         </plugin>
      </plugins>
      </build>
      </profile>
   </profiles>
   <dependencies>
      <dependency>
         <groupId>junit</groupId>
         <artifactId>junit</artifactId>
         <version>3.8.1</version>
         <scope>test</scope>
      </dependency>
   </dependencies>
</project>
그리고 C:\MVN\project\src\resource폴더에 아래 속성을 생성하였다고 가정하자.
env.properties
environment=debug
env.test.properties
environment=test
env.prod.properties
environment=prod
이제 콘솔을 열고 pom.xml을 포함하는 폴더로 가서 아래 mvn 명령을 실행한다. '-P' 옵션을 사용하여 인자로써 profile 이름을 전달한다.
C:\MVN\project>mvn test -Ptest
Maven은 처리를 시작하고 test build profile의 결과를 출력할 것이다.
[INFO] Scanning for projects...
[INFO]
[INFO] ------------------------------------------------------------------------
[INFO] Building project 1.0
[INFO] ------------------------------------------------------------------------
[INFO]
[INFO] --- maven-resources-plugin:2.6:resources (default-resources) @ project --
-
[WARNING] Using platform encoding (Cp1252 actually) to copy filtered resources,
i.e. build is platform dependent!
[INFO] Copying 3 resources
[INFO]
[INFO] --- maven-compiler-plugin:3.1:compile (default-compile) @ project ---
[INFO] Nothing to compile - all classes are up to date
[INFO]
[INFO] --- maven-resources-plugin:2.6:testResources (default-testResources) @ pr
oject ---
[WARNING] Using platform encoding (Cp1252 actually) to copy filtered resources,
i.e. build is platform dependent!
[INFO] skip non existing resourceDirectory C:\MVN\project\src\test\resources
[INFO]
[INFO] --- maven-compiler-plugin:3.1:testCompile (default-testCompile) @ project
 ---
[INFO] Nothing to compile - all classes are up to date
[INFO]
[INFO] --- maven-surefire-plugin:2.12.4:test (default-test) @ project ---
[INFO] Surefire report directory: C:\MVN\project\target\surefire-reports

-------------------------------------------------------
 T E S T S
-------------------------------------------------------
Running com.companyname.bank.AppTest
Tests run: 1, Failures: 0, Errors: 0, Skipped: 0, Time elapsed: 0.016 sec

Results :

Tests run: 1, Failures: 0, Errors: 0, Skipped: 0

[INFO]
[INFO] --- maven-antrun-plugin:1.1:run (default) @ project ---
[INFO] Executing tasks
     [echo] Using env.test.properties
[INFO] Executed tasks
[INFO] ------------------------------------------------------------------------
[INFO] BUILD SUCCESS
[INFO] ------------------------------------------------------------------------
[INFO] Total time: 4.953 s
[INFO] Finished at: 2015-09-27T11:54:45+05:30
[INFO] Final Memory: 9M/247M
[INFO] ------------------------------------------------------------------------
이제 연습으로 아래 단계를 할 수 있다.
Add another profile element to profiles element of pom.xml (copy existing profile element and paste it where profile elements ends). (pom.xml의 인자를 profile하기 위해 다른 profile 인자를 추가한다 - 원래있는 profile인자를 복사해서 profile 인자 끝에 붙여넣는다.)
Update id of this profile element from test to normal. (test에서 normal로 이 profile요소의 id를 수정한다.)
Update task section to echo env.properties and copy env.properties to target directory (task section을 echo env.properties로 copy env.properties를 target 디렉토리로 변경한다.)
Again repeat above three steps, update id to prod and task section for env.prod.properties (위 세단계를 다시 반복한다. id를 prod로 갱신하고 env.prod.properties에 대한 task section을 갱신한다.)
That's all. Now you've three build profiles ready (normal / test / prod). (끝이다. 이제 normal/test/prod 세게의 build profile을 준비했다.)
이제 콘솔을 열고 pom.xml이 있는 폴더로가서 아래 mvn 명령을 실행한다. -P 옵션을 사요용하여 인자로 profile이름을 전달한다.
C:\MVN\project>mvn test -Pnormal
C:\MVN\project>mvn test -Pprod
차이점을 보기위해 build 출력을체크한다.
Profile Activation via Maven Settings
%USER_HOME%/.m2 디렉토리에서 가능한 Maven 'setting.xml'파일을 연다. 여깃 '%USER_HOME%'은 사용자 home 디렉토리를 나타낸다. 만약 setting.xml파일이 없다면 새로운 하나를 만든다.
아래 예제에서 보이는 것과 같이 activeProfiles node를 사용하여 active porfile로써 test profile을 추가한다.
<settings xmlns="http://maven.apache.org/POM/4.0.0"
   xmlns:xsi="http://www.w3.org/2001/XMLSchema-instance"
   xsi:schemaLocation="http://maven.apache.org/POM/4.0.0
   http://maven.apache.org/xsd/settings-1.0.0.xsd">
   <mirrors>
      <mirror>
         <id>maven.dev.snaponglobal.com</id>
         <name>Internal Artifactory Maven repository</name>
         <url>http://repo1.maven.org/maven2/</url>
         <mirrorOf>*</mirrorOf>
      </mirror>
   </mirrors>
   <activeProfiles>
      <activeProfile>test</activeProfile>
   </activeProfiles>
</settings>
이제 콘솔을 열고 pom.xml이 있는 폴더로 가서 아래 mvn 명령을 실행한다. -P옵션을 사용하여 프로파일 이름을 전달하지 않는다. Maven은 active profile이 되는 test profile의 결과를 출력할 것이다.
C:\MVN\project>mvn test
Profile Activation via Environment Variables
이제 maven setting.xml에서 active profile을 제거하고 pom.xml에 언급된 test profile을 갱신한다. 아래처럼 profile요소에 activation 요소를 추가한다.
test profile은 시스템 속성 'env'가 ''test'값으로 설정되었을 때 동작될 것이다. 환경변수 'env'를 만들고 이것의 값을 'test'로 설정한다.
<profile>
   <id>test</id>
   <activation>
      <property>
         <name>env</name>
         <value>test</value>
      </property>
   </activation>
</profile>
콘솔을 열고 pom.xml이 있는 폴더로 가서 아래 mvn명령을 실행한다.
C:\MVN\project>mvn test
Profile Activation via Operating System
os 를 포함하는 activation 요소는 아래처럼 보여진다. 이 test profile은 시스템이 windows XP일 때 동작되어 질 것이다.
<profile>
   <id>test</id>
   <activation>
      <os>
         <name>Windows XP</name>
         <family>Windows</family>
         <arch>x86</arch>
         <version>5.1.2600</version>
      </os>
   </activation>
</profile>
이제 콘솔을 열고 pom.xml을 포함하는 폴더에서 아래 mvn 명령을 실행한다. -P옵션을 사용하여 profile 이름을 전달하지 않는다. Maven은 active profile이 되는 test profile의 결과를 출력할 것이다.
C:\MVN\project>mvn test
Profile Activation via Present/Missing File
이제 os를 포함하기 위한 activation 요소는 아래와 같다. test profile은 'target/generated-sources/axistools/wsdl2java/com/companyname/group'이 없을 때 동작되어 질 것이다.
<profile>
   <id>test</id>
   <activation>
      <file>
         <missing>target/generated-sources/axistools/wsdl2java/
		 com/companyname/group</missing>
      </file>
   </activation>
</profile>
이제 콘솔을 열고 pom.xml이 있는 곳으로 가서 아래 mvn명령을 실행한다. -P옵션을 사용하여 profile 명을 전달하지 않는다. Maven은 active profile이 되는 test profile의 결과를 출력할 것이다.
C:\MVN\project>mvn test